Unlock the Secret to Perfectly Juicy Stove-Top Chicken Breasts
Are you tired of dry, rubbery chicken breasts ruining your salads and sandwiches? You’re not alone! Many home cooks struggle with achieving that elusive tender, juicy chicken breast, especially when cooking on the stove. Often, it seems like the outside burns before the inside is cooked through, or the meat becomes tough and flavorless. But what if we told you that mastering
how to cook perfect chicken breasts for salads and sandwiches on your stovetop is surprisingly simple?
With the right technique and a few key insights, you can consistently create succulent, perfectly seasoned chicken breasts that are ideal for slicing into vibrant salads, layering into hearty sandwiches, or even enjoying on their own. This comprehensive guide will walk you through an easy, reliable method, transforming your chicken breast cooking woes into culinary triumphs. Get ready to elevate your meal prep and everyday dining!
Why Stove-Top is Your Go-To for Salads & Sandwiches
When it comes to preparing chicken for salads and sandwiches, the stovetop offers distinct advantages:
* **Speed and Efficiency:** Unlike baking, which requires preheating and longer cook times, stove-top cooking is incredibly fast. You can have perfectly cooked chicken ready in under 15 minutes once prep is done.
* **Superior Searing:** A hot pan allows you to achieve a beautiful golden-brown sear, locking in moisture and adding a depth of flavor that baking can sometimes miss. This caramelization is key to a delicious finish.
* **Precision Control:** You have direct control over the heat, allowing for quick adjustments to prevent burning while ensuring even cooking. This hands-on approach builds confidence and delivers consistent results.
* **Versatility:** The stovetop method is highly adaptable to various flavor profiles, making it easy to whip up chicken tailored for a Mediterranean salad one day and a spicy Mexican wrap the next.
This method isn't just about speed; it's about control, flavor, and achieving that ideal texture every single time, making it the ultimate way to prep your protein for versatile meals.
Essential Tools & Ingredients for Success
Before you even think about turning on the heat, gather your arsenal. Having the right tools and quality ingredients is half the battle won.
The Star: Boneless, Skinless Chicken Breasts
While seemingly straightforward, chicken breasts vary widely in size and thickness. Opt for fresh, high-quality boneless, skinless chicken breasts. Don't be alarmed if your cooking times vary slightly depending on the size; a meat thermometer will be your best friend. This lean protein is a fantastic canvas for flavor and a healthy addition to any meal.
Your Secret Weapon: The Mallet (and Plastic Wrap!)
This might sound like an extra step, but pounding your chicken breasts to an even thickness is the single most critical technique for preventing dry, overcooked edges and raw centers. It ensures that every part of the breast cooks at the same rate, resulting in uniformly tender meat.
* **Pounding Tool:** A meat mallet is ideal, but the bottom of a heavy skillet, a rolling pin, or even a sturdy can will work in a pinch.
* **Protection:** To keep things hygienic and mess-free, place your chicken breast between two sheets of plastic wrap or inside a large gallon-sized resealable plastic bag (leaving a small gap for air to escape). This also prevents tearing the delicate meat.
Flavor Builders: Beyond Salt & Pepper
While a simple sprinkle of salt and freshly ground black pepper can work wonders, don't hesitate to get creative. Spices are your opportunity to tailor the chicken to its intended use.
* **Classic:** Salt, black pepper, garlic powder, onion powder, paprika.
* **Italian Inspired:** Dried oregano, basil, thyme, rosemary.
* **Mexican Flair:** Cumin, chili powder, smoked paprika, a pinch of cayenne.
* **Herby Fresh:** Dill, parsley, chives (add fresh herbs at the end for best flavor).
Consider also a dash of olive oil for searing and a squeeze of lemon juice after cooking for brightness.
The Right Pan Matters
For stove-top chicken breasts, a heavy-bottomed skillet is best. Cast iron or stainless steel pans excel at retaining and distributing heat evenly, which is crucial for a good sear and consistent cooking. Non-stick pans can also work, but heavy-duty ones will yield better results.
Step-by-Step Guide: How to Cook Perfect Chicken Breasts for Salads and Sandwiches
Follow these steps, and you'll be amazed at the tender, juicy results.
1. Thaw Completely: The Foundation of Even Cooking
This step cannot be skipped. Starting with partially frozen chicken breasts guarantees uneven cooking – you’ll end up with a cooked exterior and a cold or raw interior. Always ensure your chicken is completely defrosted before you begin. Plan ahead by moving frozen chicken to the refrigerator 24 hours prior, or use the cold water thawing method for quicker results.
2. Pound It Out: The True Secret to Tenderness
This is the game-changer! Place one chicken breast at a time between two sheets of plastic wrap or inside a plastic bag. Using your meat mallet, start pounding from the thickest part of the breast, working outwards. Aim for an even thickness of about ½ to ¾ inch across the entire piece. This not only tenderizes the meat but also ensures it cooks uniformly, preventing dry spots. For a deeper dive into this essential technique, check out
The Secret to Tender, Juicy Chicken Breasts Every Time.
3. Seasoning or Marinating: Flavor from the Inside Out
Now it's time to infuse flavor! If you're marinating, do so for at least 30 minutes (or up to 4 hours in the refrigerator). If not, generously season both sides of your pounded chicken breasts with salt, pepper, and your chosen spice blend. Don't be shy with the seasoning – much of it will cook off or adhere to the pan. For an extra boost, you can even rub a tiny bit of olive oil directly onto the chicken before seasoning to help the spices stick.
4. Heat the Pan: The Sizzle Factor
Place your heavy-bottomed skillet over medium-high heat. Allow it to heat up for 2-3 minutes. You want it hot enough to create an immediate sizzle when the chicken hits, but not so hot that it smokes excessively. Add a tablespoon of high smoke-point oil (like avocado, grapeseed, or canola oil) or spray with cooking spray. Swirl to coat the pan.
5. Sear & Cook: Mastering the Flip
Carefully place your seasoned chicken breasts into the hot pan. You should hear that satisfying sizzle!
* **Initial Sear:** Cook undisturbed for 5-8 minutes, depending on thickness, until a beautiful golden-brown crust forms on the first side. Resist the urge to move or flip it too early – that sear is crucial for flavor and preventing sticking.
* **Second Side:** Flip the chicken and cook for another 5-7 minutes. If at any point the chicken starts browning too quickly, reduce the heat to medium.
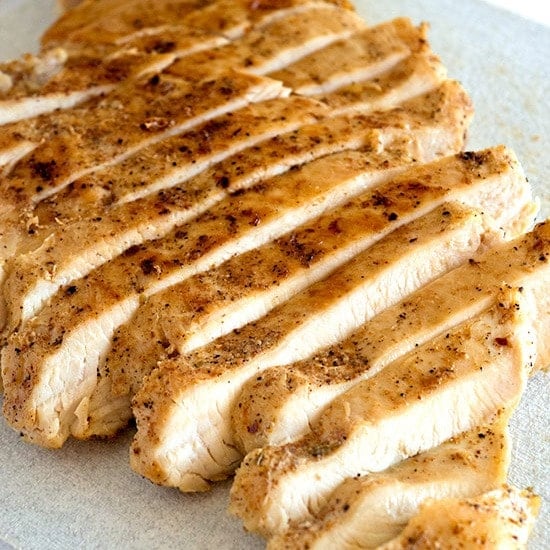
* **Check for Doneness:** The internal temperature should reach 165°F (74°C). If you don't have a meat thermometer, cut into the thickest part of one breast – the juices should run clear, and the meat should be opaque white throughout.
6. Rest for Juiciness
Once cooked, immediately remove the chicken from the pan and transfer it to a cutting board. Crucially, let it rest for at least 5-10 minutes before slicing. This resting period allows the juices, which have been pushed to the center during cooking, to redistribute throughout the meat, ensuring every bite is moist and tender. Skipping this step is a common mistake that leads to dry chicken. This is key to achieving
Perfect Juicy Chicken Breasts: No More Dry Meals for Salads & Sandwiches.
Pro Tips for Next-Level Chicken Breasts
Want to truly master the art of stove-top chicken breasts? Consider these additional insights:
* **Invest in a Meat Thermometer:** This is the ultimate tool for perfectly cooked chicken. There's no guesswork involved when you can confirm the internal temperature has reached 165°F (74°C). It prevents both undercooking and overcooking.
* **Don't Overcrowd the Pan:** Cook chicken in batches if necessary. Overcrowding the pan lowers the pan's temperature, steaming the chicken instead of searing it. This prevents that beautiful crust and can lead to tougher meat.
* **Batch Cooking for Meal Prep:** Once you’ve mastered this method, consider cooking 3-4 breasts at once. Let them cool, then slice or dice and store in an airtight container in the refrigerator for up to 3-4 days. It’s perfect for quick lunches throughout the week!
* **Flavor Boost with Pan Sauce:** After removing the chicken, you can often create a quick pan sauce. Deglaze the pan with a splash of chicken broth, white wine, or lemon juice, scraping up any browned bits. Swirl in a pat of butter, and you have an instant sauce to drizzle over your chicken.
Conclusion
Cooking succulent, juicy chicken breasts on the stove for your salads and sandwiches is no longer a kitchen mystery. By focusing on a few simple yet powerful techniques – proper thawing, even pounding, generous seasoning, and the crucial resting period – you can consistently achieve perfect results. Say goodbye to dry, bland chicken and hello to tender, flavorful protein that will elevate your meals to new heights. So, grab your skillet, follow these steps, and discover just how easy it is to master
how to cook perfect chicken breasts for salads and sandwiches. Your taste buds (and meal prep routine) will thank you!